Birdveillance update

Yesterday Yiyang and I presented Birdveillance for our final Physical Computing class. We’re proud of our work, but feel like we still have more work to do on this project, and hope we’ll get a chance to develop it for the winter show.

TO DO LIST:

** install flash in head, tweak head & eyes
** felt neck & tube
** will email work or do we need to switch to HTTP POST JSON API?
** beak
– figure out Speech to Text
– Beak
– eyes
– sew wings
– wings — motors?
– upload photos somewhere else to get around twitter photo upload limits

– feet?
– responds to sound threshold (goes to sleep if below threshold)
– slower motion to catch the faces
– clearer eye / photo signal (add a flash from a camera)
bird stand: box, label with twitter handle

Surveillance Bird update

Surveillance Bird is coming along after quite a lot of work, it’s not quite there yet but we’re on the right track.

All of the tests we’ve done so far have indicated that the bird needs to look & act like a bird, inviting people to interact in a fun/fuzzy way. Otherwise people will think it’s a surveillance robot and they will run away. At first we thought we could find a bird toy, but the Angry Birds’ head is too much of a symbol, and looking online we were unable to find a big enough bird that would arrive in time. We decided it’d be fun to make our own, anyway. Yiyang is a painter and I haven’t done paper mache since kindergarten but we thought we’d try to paper mache. Then I was going around the city and found that everything I looked at looked like it could be a part of the Bird. So I found some Christmas ornaments, a plastic apple, and a cookie jar at the dollar store along with some fuzzy socks and we’re going to make this our bird.

IMG_7493

Today on my bikeride to ITP I was thinking about Surveillance Bird’s need for a base to hold the motor in place. I saw a wooden bedframe, snapped off a leg, took it to the shop and—with the help of Dan and Scott who showed me how to use some new tools—managed to turn this wooden leg into a base for the motor. Meanwhile the xmas ornament proved too fragile for us to slice out a camera hole, so we used the plastic apple. Plastic is great!

We had a lot of trouble with Serial communication between Processing (face detection) and Arduino. After hours of troubleshooting, it turned out that using Delay() on Arduino was the source of our problem. I had been using random delays to simulate a noisey birdlike movement—the steady scanning we presented in class was way too ominous. Moon showed me a way to simulate delay by creating a counter, and that’s doing the trick.

One nagging issue is that the Pan/Tilt bracket for our two motors came with cheap little screws, and so far we broke four of them. We really needed those. I’ve been to Radio Shack, Home Depot, and Ace Hardware in search of replacements but none of them carry screws this small. And then on top of this, we’ve burned out two motors and had to borrow one. Each servo motor has a different shape to its connectors, and the connectors need to be spaced a certain way in order to screw properly into the Pan/Tilt bracket. This is the one piece we thought we wouldn’t have to worry about, but instead it feels like it could fall apart at any moment.

Another issue is Audio. We want to have the bird tweet when it moves, flash when it finds them, and then tell say “follow @birdveillance on twitter”. There is only 32kb of flash memory on the arduino, so our options are limited. The PCMAudio library from High-Low Tech seemed perfect, but it conflicts with the Servo library. The Mozzi library seemed like it’d work, but regular samples are too large, and Huffman-compressed samples don’t seem to wanna play in this sketch. They do play in an empty sketch, but if I add the Serial library to that sketch and start serial communication, it slows down the sample playback, so maybe the sound is actually playing but at such a slow speed that it is inaudible…

We’re still not sure what the bird is going to do when it sees people. So far we have the ability to take a photo of them and post it to twitter. We’ll hopefully figure out some sound. And we have lights installed in its head. We also have the ability to listen and post Speech To Text to twitter, but we need a good microphone if this is going to work in a bustling space like the ITP floor. Maybe we can solve our audio problem with the computer (and our own speaker?) since we’re already relying on it so much.

BirdVeillance: Motors, Diagrams, Bill of Materials, Timeline

Tonight I experimented with different types of motors while thinking about the conversations Yiyang and I have been having about our final project. After doing the two H-Bridge labs, I made this with a servo motor:

I think this type of servo-motion will be perfect for the Surveillance Bird. We just need to get motors with enough torque to support the weight of the bird + camera + platform. The weight is still a variable, but we have a much better idea of what we’re working towards with the final project.

Screen Shot 2013-11-13 at 12.44.28 AM

We started off with too many things we want to accomplish. At first we had multiple bird-shaped cameras scattered about a room. From there we wanted the birds to make sounds / talk / record video.

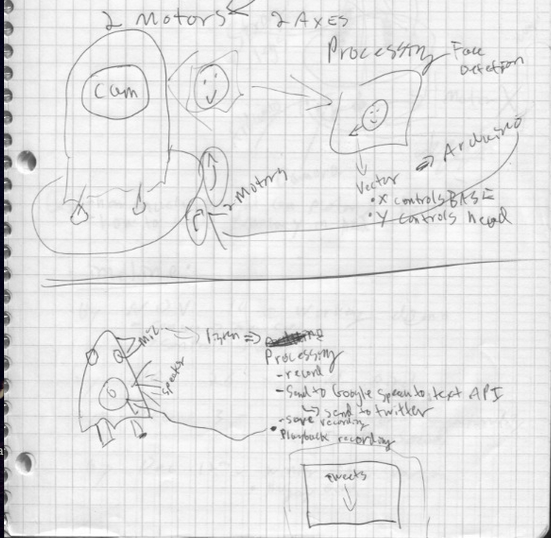
We’ll start off focusing on getting one bird with a camera in its head to rotate so that faces are the centScreen Shot 2013-11-13 at 12.44.09 AMer of its video. This is the first systems diagram I’ve included.

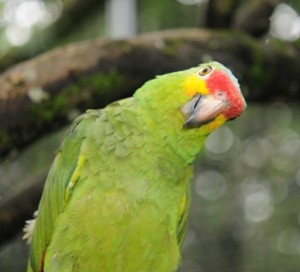
We got a lot of feedback that if we used video, we should complete the feedback loop because people want to see the video. I would prefer to work with sound and use sound to allow people to have a conversation with the Surveillance Bird. The bird would either repeat things it heard when volume was above a certain threshold (like a parrot) or it would say things. We talked about allowing one of us to control the bird but I’m more interested in letting the program dictate the bird’s interactions. If we incorporate sound, this would require installing a speaker and microphone into the bird. It would also be nice to have a third motor tilt the bird’s head while it’s “listening.”

red_lored

If we can get sound working, it would be fun to complete the concept of Surveillance Bird by sending audio snippets to a Speech to Text API, and tweeting the results from @birdveillance. We could then display the text on a screen (perhaps the screen of the computer that we’re using to process the video) or have the bird read the text and add “follow me @birdveillance on twitter.”

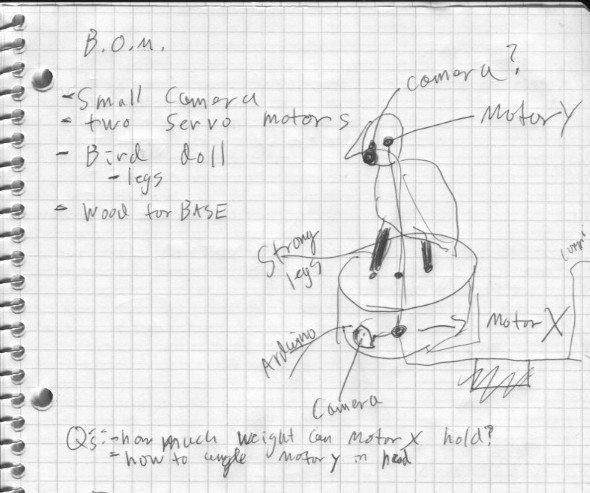
INITIAL BILL OF MATERIALS

pcompFinalSketchingP2

  • Bird Doll
  • Small USB Camera (from ER)
  • Wood for base
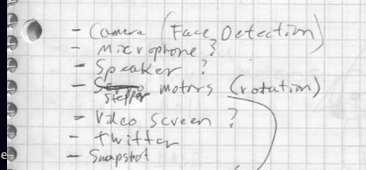
  • Two (or three?) servo motors (one of X turn, one for Y tilt, and possibly one more to tilt the head to the side like an inquisitive dog when “listening”) strong enough to rotate camera/bird/base.
  • Maybe foam or something to keep the motors and camera in place?
  • Arduino
  • Computer with Processing OpenCV face detection library
  • Microphone (part of the camera?)
  • Speaker
  • Cables to connect everything

TIMELINE

  • 11/19 – functional prototype that can detect faces and rotate at least on the X axis.
  • 11/26 – tweak the bird’s looks and movement. Create bass and figure out how to hold everything together.
  • 12/2 – add sound elements to complete the surveillance feedback loop.
  • after PComp final, we might continue to tweak and try to install this in a bird-like location during the winter show.


Audio Transformer

My final project, “Audio Transformer,” will be a simple audio editor that functions in the browser.

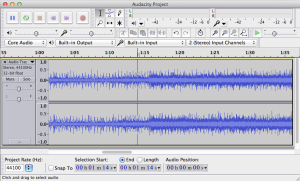
I’m designing for kids age 7 and up who have never worked with audio. The idea came from teaching afterschool music workshops, and seeing how frustrated kids get by the defacto freeware program Audacity. With so many features, Audacity can be overwhelming even for adults—here’s a screenshot.

audacity-macosx

I want to make this work in the browser because I’ve also been researching this topic for my class Technological Trends in Music Education: Designing Technologies and Experiences for Music Making, Learning and Engagement. So much of the technology we’ve looked at in that course is happening in the browser. Some technology, like Scratch, incorporates audio editing features. But I have yet to find any dedicated audio editor that works in the browser. I think there is a need for this sort of specialized tool, something like the pixlr photo editor but for audio. I could even see myself using Audio Transformer in favor of pro audio programs when I just need to make a simple edit.

My goal is to keep things simple by focusing on the features that interest the kids in my workshop. They want to hear sounds backwards, slowed down, and sped up. They need to be able to delete, crop, cut, copy, paste in order to make their edits. Fades, normalizing file volume, and determining the file’s starting point (ie. cropping out initial silence) are not so exciting for kids, and often neglected, so these should all happen automatically by default. Undo and Redo are essential. I’m going to model these functions after Scratch’s audio editor with two cursors for selecting a segment, and dropdowns to choose effects/edits.


The sound data needs to be presented in a visually meaningful way. I think it’s important to introduce the concept of a waveform, and to visualize the frequency spectrum. I’ve begun to experiment with visualizations that can represent frequency and attack/decay in meaningful ways. For example, I’d like to have a visual method of changing the bass/treble frequencies, something like this:

I went to the Sound as Data workshop and was very inspired by the possibilities for visualizing sound, but all of the examples use Minim, which uses java.sound and therefore won’t work in the browser. Maxim is a sound library that has a javascript version, so I made the above using the Maxim library because I thought it would work in the browser…

…but it doesn’t work in the browser. There are a lot of issues with Processing, sound, and the web. So I may just have to use JavaScript. I’m excited about the idea of delving into the WebAudio API which has a lot of the stuff I’d need.

Here’s a javascript demo that visualizes the waveform and has the beginnings of the UI that I’m going for.

Here’s a functional mockup that actually edits an audio file (using PHP and SoX, running on a server)

Next, gotta figure out how to pull this all together! My big question is:

  • How can I get JavaScript talking with PHP? I need to send variables from one to the other. From my research and experiments so far, I think the answer involves AJAX, POST and html forms, but nothing is working so far.

Creativity: Flow and the Psychology of Discovery and Invention

What is the key to happiness? How do we find meaning in the chaos of life? And why do our best ideas comes when we least expect them? These questions are the domain of psychology theorist Mihaly Csikszentmihalyi. His answer derives from Flow, a concept he outlined in his 1990 book Flow: The Psychology of Optimal Experience. Flow basically means “gettin in the zone.” I’m responding to one of his follow-ups from 1996, Creativity: Flow and the Psychology of Discovery and Invention, which examines how Flow impacts “Creativity.” Csikszentmihalyi distinguishes Creativity (with a capital “C”) from other forms of creativity in ways I find problematic, but the distinctions and theories are useful as I look for inspiration and happiness in life. Continue reading

PComp Idea

Bird Surveillance System – a network of sensors hidden in tree-like areas, like birds, that observe you. When you rush by, they tweet one note and light up red. But when you stop to observe their presence, they cycle through a sequence/arpeggio of light and sound. There are three of them hidden throughout the space. Find them, get your friends to join in, and make music out of the surveillance network.

Are they birds, or surveillance cameras?

What is the interaction? How can they be quiet when nobody is around, beep fast when there’s a lot of movement (someone rushing by), but play music when somebody stops to interact?

Pixel Experiments

So much to play with this week! Here are my two favorite experiments.

Bearpocolypse – loops through each pixel in the bear image, compares it to every other pixel, and changes each pixel based on “distance” of the RGB.

source: http://itp.jasonsigal.cc/icm/pixels/bearpocalypse/bear.pde

In Motion Dot-tector – built off of the Learning Processing Motion Sensor, and inspired by something I saw at the Exploratorium as a kid. Ellipse size decreases if there is a lot of motion, and ellipses only show up at pixels where there is motion (a difference between current capture and the most recent capture). This one took a lot of memory to run.

source: http://itp.jasonsigal.cc/icm/pixels/inmotion/inmotion2js.pde

I got caught up in all of the examples and libraries, but wasn’t sure where to take them. I’d like to come back to Pixels to make music out of shapes and/or movement.

Reading Notes: Music Education with Digital Technology

The four chapters we read this week were very inspiring as I reflect on the experience of my digital music workshop.

:: In “The DJ Factor,” Mike Challis describes a curriculum for at-risk 14-16 year olds in the UK who have not had any previous music experience. The key to his experience is to start from music that the students are interested in, which is novel for students who often have a sharp divide between music in and out of school. In the UK, kids listen to electronic music, UK garage and hip-hop. The first stage is to put music into their hands as DJs, and through a 4-step process of removing elements to fill with original elements, they produce a piece of original music.

In Stage 1, beatmatching is used as a way to learn about beats and bars. I’ve struggled a bit to teach this concept to the kids in my workshop, and despite the fact that they are much younger (some are as young as 7), I can’t think of a more hands-on approach than using two turntables and a mixer.

In Stage 2, Reason is introduced as a beat-making tool, and students create original beats to layer over their DJ mixes. The main lesson here for me is that the students aren’t given a comprehensive overview of how the program works, but instead they just dive in to figure it out on their own. Reason gives immediate feedback, so it may in fact be easier to learn from diving right in than by a general tutorial. The instructor’s role is to answer questions, monitor, intervene when necessary and provide feedback.

In Stage 3, students add a bassline either with a live performance using MIDI, or by sequencing each step of the melody. And in stage 4, structure is introduced by listening to the music that the students brought to the program. At this point, the original mix can even be removed to leave each student with a completely original composition (not to stay that remixed elements couldn’t also be used in original ways). The article mentioned that Dizzee Rascal had this type of opportunity when he was a teenager, I found this to be really inspiring.

:: The next chapter, “Composing & Graphical Technologies” by Kevin Jennings, gave me a lot to think about as I design my web-based audio editor. I’m working on the design, and the visual representation of sound will have a significant impact on how people use this tool.

Graphical interfaces can provide novel ways for young people to dive into composing without needing to learn notation or a sequencer. However, music is not visual, so any attempt to represent it visually biases and affords certain types of uses, whether it’s traditional notation or sequencers or Finale or Logic or the original programs Hyperscore and Drum Steps mentioned in this paper.

I’m really inspired by idea idea of Hyperscore, in which ‘motives’ can be brought into a ‘sketch.’ The author believes that this particular interface is best-suited to teaching rhythmic concepts, texture and form, but despite his efforts, questions concerning pitch did not come about as naturally.

If you set a young person free to explore music composition in an environment with certain affordances, they will come to understand many different types of musical concepts on their own. After an initial stage of “bricolage” or “just messing around” to become familiar with the interface, Jennings observes the way students settle on a clearer idea to explore. This bricolage is an important part of the process that reminds me of Mike Challis’ approach in teaching Reason. The questions come up as part of the exploration process, and in the case of Hyperscore, concepts like inversion, repetition, and variation appear in students’ composition without any mention of these concepts by the teacher. In short, musical concepts don’t need to be explained as long as the system affords the potential to discover them through exploration.

In contrast to HyperScore, Drum-Step as a graphical interface that students seem more likely to interpret in non-musical ways. Their motivations are more about making things that look cool than by the musical inspiration. So graphical interfaces can have drawbacks. Interfaces need to incorporate non-musical elements, and there is a point where those might eclipse the musical elements. If the goal is music education, then it’s best to design an accessible path into musical understanding.

In the case of my web-based audio editor, there is a question of whether to follow the established ways to represent sound, or invent my own. There is also a question of how to describe the various effects that can be used. If an effect is offered, it will be used, is the message of Jennings’ article. However, in the case of a “feature-bloated” program like Microsoft Word, only a small percentage of the program’s features are actually used on a regular basis by most users. That is the problem I’m trying to solve by creating a program that streamlines some of the audio editing features available in other programs like Audacity. But I need to think very carefully about how they are represented visually.

:: Reading Steve Dillon and Andrew Brown’s 2005 chapter on networked collaborative music-making  here in the year 2013, I’m struck by the way they approach “computer as instrument,” “cyberspace as venue” and “network as ensemble” with such novelty. The trick for this type of program to work is to send data (i.e. MIDI notes, OSC messages) instead of the actual audio (which is also data, but a different kind that takes more memory).

Some of the benefits of networked jam2jam are that this type of experience invites listening and creating at the same time. Participants need to use musical terms to communicate their ideas, and jam2jam provides chat boxes that facilitate.

Dillon & Brown identify three ways that students collaborate without being in the same physical space (country, even), : Disputational involves individual decisions without agreement. Cumulative collaborators largely agree, but avoid confrontation. Exploratory is a give-and-take, modifying each others ideas to build something that is greater than the sum of its parts, and that seems like the goal here.

Tangible Interactions

To determine the actual amount of time it will take to make something, consider the rule of pi: multiply how long you think it will take by pi (3.14). This rule of pi is surprisingly accurate.

-Dustyn Roberts, Making Things Move

Yiyang and I made some good progress on our midterm project this week. We picked up a couple square-ish pieces of clear acrylic, at 3/8″ thick which we think will be the thickest possible for laser cutting. They are smaller than our initial concept, but it is helpful to test out the interaction. We used the drillpress to drill space for an RGB LED. Then we sandwiched sensors in between the acrylic pieces, supported by rubber feet, and tested the Arduino program to see what types of readings we were getting and get the light working in a nice way. We feel that the light and its slow decay is a very important part of the interaction because its decay will mimic the sound that the action produces.

First we tried a piezo from Radio Shack (above) but that sensor was too thick. Then, after it arrived in the mail from adafruit, we tried a force-sensing resistor, but that was not giving us a reading for some reason. Maybe we’ll come back to FSR’s later. But the best sensor so far was a flat round piezo that was working really well and also triggering the sound we want it to trigger.

We’re thinking to build a few drum pads for now, with the longer term goal of working towards a ‘step sequencer.’

Working with actual materials, sensors and code to make this prototype is really helpful for me. From here, we need to figure out a good way to keep the two pieces of acrylic together. We need flat rubber feet rather than rounded because they’ll be easier to stack. We need to find the best position for the sensor that will keep it insulated from vibration of the floor surrounding it (this was a problem until we moved the sensor to the middle of the acrylic sandwich—maybe we need multiple sensors in parallel? We’ll see). A lot will depend on the size we settle on for our acrylic pads. I think that the size we’ve been working with, roughly 5″x5″, is pretty nice, but originally we’d hoped to have bigger pads. If we do work with bigger pads we might need additional sensors to pick up the same force no matter where the user steps—this already impacts the sensor reading.

A big part of our project is the look and feel. I think the wires and sensors would look cool sandwiched between two pieces of acrylic, maybe we can drill a hole in the center of the bottom piece to pass everything through from the ground below. One way or another we’ll need to tidy and/or hide all of the electronics so that the user can focus on the sound, the light, and the feeling of dancing without worrying that they’re stepping on something that might break (hopefully it’ll be sturdy, too!).

I have been thinking about interactions in ways I had never considered.